
I'd really LOVE to send all of you a treat bag, but I'm not Santa Claus. Or the Great Pumpkin. Whatever. Sadly, I just can't manage it.
But I thought some of you might be interested in making one for yourself or someone else. Or maybe you'd like to make several. I'll tell you how I made mine so you can make some too.
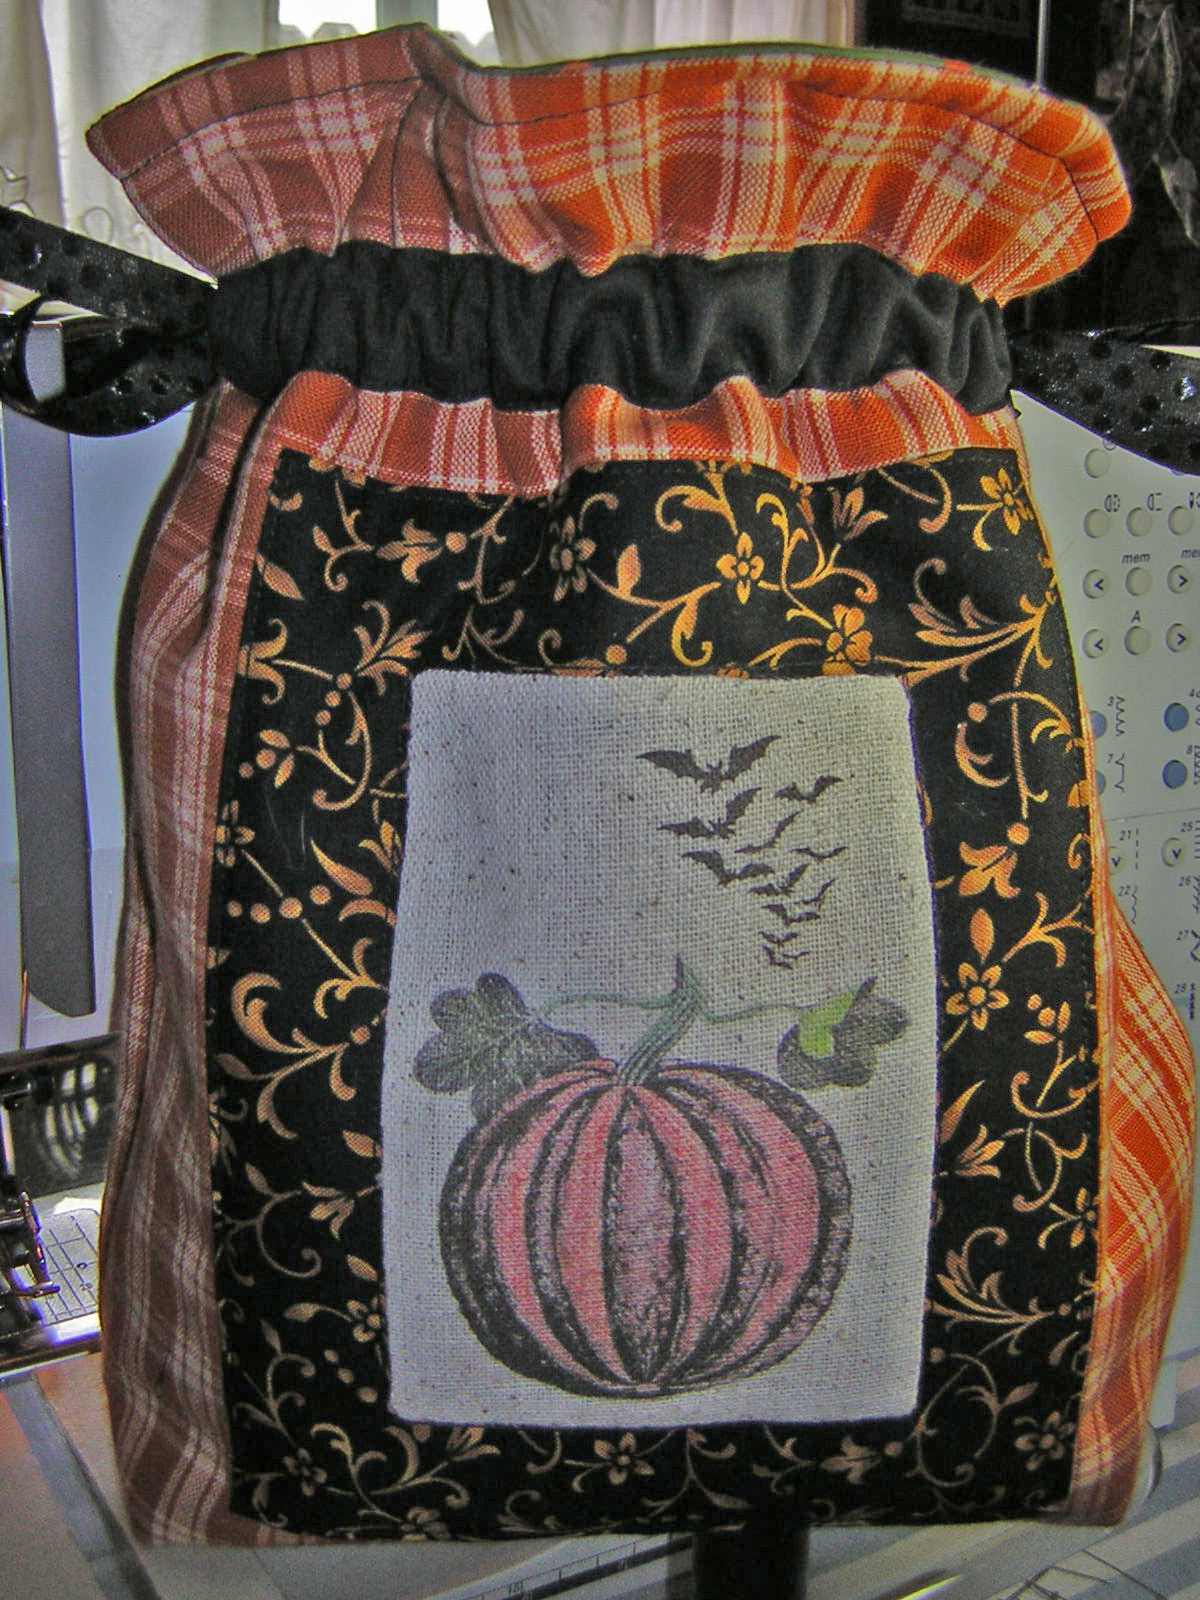
For the center part, I bought a digital download from Etsy and printed it (four images to a "sheet") onto fabric by ironing a 8-1/2" x 11" piece of freezer paper onto the back of the fabric (kind of a nubby muslin or fine burlappy stuff) and feeding it through my printer. If you want to try this, experiment a little. I ended up with some ink smudges around the edges of my fabric, but I think that's because I used a heavier fabric. You can find instructions online--just do a search for "printing on fabric."
Besides the center graphic (which could be a preprinted piece of fabric instead), here's what you'll need to make the basic bag:
Two pieces of outside fabric cut 10-1/2" x 12-1/2"
Two pieces of inside fabric (lining) cut 10-1/2" x 12-1/2"
Two pieces of batting (regular loft, cotton or cotton/poly) cut 10-1/2" x 12-1/2"
Two pieces of black bias tape cut 10" long (single fold or double fold--doesn't matter; it needs to be wider than the ribbon)
Two pieces of ribbon cut 18" long (or longer)
Here's a photo of what I used:

Make sure whatever you want in the center of the bag is at least 2-1/2" from the bottom edge. Here I was lining up the bottom of the image I sewed into the front of the bag--I'll tell you a little more about that in a second.

Then I positioned the top of the bias tape 1-1/2" from the top edge of the bag.

I then pinned down the bias tape, turning the raw ends under (you can see that in the next photo). And because I was adding the image (with the black background) to the front of the bag, I pinned that in place too, so I could sew it on along the turned under edges. That stitching holds the fabric and batting layers together; if you're making a plain bag, at this point you might want to add some simple quilting to keep the layers together. I also pinned the fabric to the batting at each corner and in the center of the two longer side edges--this keeps the layers from slipping during stitching.

Stitching through these layers works best with a walking foot. You may also need to adjust the foot pressure for the thickness of the fabric, batting, and bias tape.

Sew along each edge of the bias tape, using top and bobbin thread to match the tape. This will form the channel for the ribbon ties. Make sure the bias tape does not extend into the seam allowance.
Also, at this point, sew down the center graphic or add a few "quilting" lines to secure the layers. Next, right sides together and batting side out, stitch together the back and front of the bag along the side seams and bottom. I didn't take photos of this part, because I'm sure you've sewn a million seams!

Next, we'll form the bottom base of the bag. On the batting side of either the front or back, measure and draw squares at both bottom corners--the squares should measure 1-1/2". (I drew these lines before stitching the seams--either way works.)

Cut along the drawn lines of the square.

At the cut-away square, match up the bottom seam with the side seam. The cut away square will form a straight line. (Magic!)

Stitch along the raw edges; repeat on the other corner of the bag.
There! You've finished the outside of the bag. Leave it wrong side out for now and set it aside. Next we'll make the lining.
Place the lining pieces right sides together and sew along the sides and bottom seam, leaving a 3" to 4" opening along one edge of a side seam for turning. As with the outside of the bag, draw 1-1/2" squares at the bottom corners and cut away. Sew the corner seams as you did for the outside of the bag.

Turn the lining right side out and push it down inside the outer bag.

With top edges matched up, wrong side out, right sides together, pin along the edges and sew a 1/4" seam. Turn outside of bag right side out by pulling it through the opening in the side seam lining.

At this point, your bag should look like this:

Finger press the opening in the lining seam and sew closed--on the machine or by hand, whichever you prefer. Tuck the lining down into the outer bag and pin along the upper edge of the bag. Topstitch 1/4" from top to hold layers in place.

Run ribbon through casings (I like to attach a safety pin to one end of the ribbon to help me push it through). Gather and tie on sides. Done!
Now fill it with goodies and mail it to me. Make another for yourself. Enjoy!


13 comments:
Adorable! Thank you for sharing your tutorial!
Donna
Thanks for sharing your tutorial for this adorable bag....I can't wait to make a some!
Love this--- Thanks... I'm going to give it a try.
That's cute!!! Thanks for sharing.
Great project! I like to use printed treasures to print on. You can do alot with this tutorial just changing the themes.
Thanks for sharing.
Great tutorial! I love the Great Pumpkin!
Thank you for sharing! I may have to make a few for Christmas! No time to get them done for Halloween.
Great tutorial - I've done the "square off bottom corner" thing but not by cutting it out first - your way is much easier! Thanks! Also, you might want to invest in Print Shop software. It's not too expensive ($50 max.) and it has tons of images to transfer to cloth. I use the June Taylor brand of transfer cloth and I love it. I use it to do my labels - I make 4 labels at a time using Print Shop's greeting card template - it uses the transfer cloth most efficiently that way. I can't wait to see what else you cook up this month!!
Thank you for sharing. I can see it working with part of a fabric panel and for using with Xmas fabric
Very cute! I can't wait to try it! Thanks!
Wow, it was a surreal experience reading your tutorial and looking over at "my" bag. I love the bag and so does everyone in the family! Thank you KIM!
Thanks for the inspiration and the great tut!
What a great idea! TOO cute, Christmas goodie bags would be adorable too. Think I will try some sizing adjustments and attempt one of those "retro" 50's drawstring handbags. Love the way you did your cut out corner, so much easier than the way I've been doing it. THANKS!!!
Post a Comment