Sunday, October 10, 2010

Hey, Thank You!

I got on the computer tonight to check emails and write my blog and I was reminded, once again, of how much I enjoy hearing from you. "Talking" with those of you who read my blog enriches my life, and I appreciate it when you take the time to leave me a comment.

Thursday night I finished the second wool project for my class--despite the stomach pains I was experiencing. Really, doing the stitching and seeing my project ever closer to being finished took my mind off feeling ill. Do you find the same thing to be true when you're not feeling well but quilt anyway? I think it's just about the best medicine!


With the snowman, I wanted to offer a winter project that didn't scream "Christmas," and I think this works. I dug into my stash of vintage Thimbleberries fabric for the border, but the project only requires a little, so I decided I could make the sacrifice. I think this really is my favorite Thimbleberries fabric of all time.

Did you know that today's 10-10-10? Kind of cool, huh? It's also Thanksgiving in Canada--also cool, right? So in honor of a couple cool things and just because I like you, I thought I'd have a little giveaway. I ordered a couple of these Halloween panels which would make a pair of vintage-looking Halloween pillows or serve as the inspiration for any number of other ideas, and I thought I'd share by giving one of the panels away. Each of the two squares in the panel measures around 18" to 20"--I haven't measured them but that's my estimate. Here's the first one:


And the second:


If you'd like a chance to win the panel, please leave me a comment on this post telling me you want to be entered and I'll draw a winner Monday night--the winner will be posted on my Tuesday blog post, and you'll need to come back to see if you've won.

Good luck!

COMMENTS CLOSED--WINNER ANNOUNCED SOON!

Saturday, October 9, 2010

Ah! That's Better!

I don't know what it was last night, but it hit me when I was at the grocery store, buying ingredients for four dozen muffins (two dozen of each of two kinds of muffins) that I'd committed to baking for the office today. Really, NOT a good time to get ill! All I can think is that something I ate for dinner didn't agree with me--no one else in my family was sick so it must have just been something that affected me. Or maybe Hubby's trying to poison me. (I'm just sayin' if you hear I've suddenly moved on to that big quilting bee in the sky, tell the coroner to check for toxic substances, okay?)

And while a good night's sleep didn't completely wipe out whatever was ailing me, I felt well enough when I got up this morning to make the muffins--with frequent hand washing and other precautions to make sure that in the event I actually had some kind of bug, I wouldn't pass it on to anyone else. And, as the day went on, my stomach started to feel better and better, and by tonight--well, I wouldn't want to test it with anything too hard to digest, but I'm feeling a lot better than I did. So, of course, my friend Patty was right when she left a comment saying she'd checked Sacramento news and there was no news story about a woman blowing up.

Also in her comment, Patty asked a question about quilt kits and I thought I'd ask you tonight--

"Question.. do you find yourself hanging onto old 'kits' years later, or do you disassemble them and use the fabric in something else. I still love quite a few of them. But, once I've bought it and put it away... the desire to actually MAKE the quilt keeps taking a back seat. Just wonderin'????"

I've known Patty for years--ever since she had an online shop selling Thimbleberries fabric. She's the person who first told me about a Yahoo Thimbleberries group we both belong to. If you're familiar with Thimbleberries, you probably know they've designed with an eye toward quilt kits forever, and have done yearly block of the month projects probably longer than anyone else. Personally, I rarely buy kits because I have such a habit of changing things in other designers' patterns, but I think I'm a little unusual in that regard--particularly when it comes to Thimbleberries. So what do you think? How would you respond to Patty?

Friday, October 8, 2010

Writing In Sick

I'm not sure what's wrong exactly, but I know it's my stomach. And I really don't have much interesting to "talk" about tonight because the stuff that interests me at the moment . . . well, let's just say it would be WAAAAAY too much information for you to read about with your corn flakes in the morning. So hopefully I'll be back tomorrow with something a little more fascinating. And if not? Check the news stories about the Sacramento woman whose stomach exploded. That would be me.

Thursday, October 7, 2010

Use It Up or Save It?


What type of personality are you? Do you like to use things up, or do you save things in case you just might need them some day?

Most of the time, I tend to save things. My pantry and freezer are well stocked with things I may need someday. My fabric stash is abundant--including my scrap drawers. My craft closet is full of this and that. And I don't discard shoes or clothing until I'm absolutely certain I'm never going to wear them again, no matter how nicely they pair up with other items in my wardrobe.

Hubby is a user-upper. If he sees some kind of food item in the cupboard or freezer (like the tri tip he defrosts and grills at every opportunity he can), and he knows it's been there for a little while, he thinks it needs to be used up. And sometimes he's right. But sometimes he isn't, and I'll find he's used up whatever the key ingredient is in some special recipe I've planned.

The other night, when I'd decided to make Sandy Gervais' sister's apple dumpling recipe, I was giddy to find we actually had a can of Mountain Dew in the refrigerator. I'm not sure how it came to be there because none of us--me, Hubby, or the Wild Child--drinks Mountain Dew, but there it was. I'm surprised Hubby didn't throw it out or feed it to the dog just so he could use it up and get it out of the fridge! But the story has a happy ending because it was there when I needed it--and I didn't have to send HIM to the store for a can of Mountain Dew.

On the other hand, we trade roles when it comes to our bank accounts (yes, we each maintain separate accounts). Hubby's the one who saves. I'm more inclined to use up any "extra" cash that might be in my account. All in all, I guess that makes Hubby a frugal person and me a hording spendthrift. But it works for us--maybe we just balance each other out.

How about you? If you have a tendency to buy fabric just because you like it, does that tendency carry through the rest of your life--for instance, do you do the same thing with food, clothing, etc? Or, if you only buy fabric you need for a specific project, are you also that way with food, clothing, etc.? I'd love to hear about your "use it up" or "save it" habits!

Wednesday, October 6, 2010

Wool Project #1

I'm teaching my wool class (where to find it, what to do with it, and how to dye it) again in a few weeks--this is the one I taught last spring. I had a full class with a few students on the waiting list and unable to get in, and so I was asked to teach it again. Last spring, I gave my students a choice of three different kits, but they were all spring-themed, so I wanted to design a few new fall and winter projects for this class. That's what I've been working on the past week, and I thought I'd show you the first one--the one for fall. (Please ignore the white lines on the smaller pumpkins--I haven't washed them out yet!)


I'm trying to keep the projects reasonably simple with not too many pieces, since the purpose of the kits is to give the students an opportunity to work with wool and learn a couple basic stitches; not necessarily to create an heirloom masterpiece the first time out. The next sample I'll work on is a snowman for winter; the third--which I haven't even drawn out yet--will be more of a Christmas project, I think.

I started working on this one with my stitchery group on Saturday, but I did so much talking and so little stitching that I barely got the pumpkins done. I think, too, that my friends might be a little surprised to see this project finished because the drawing I had with me looked somewhat different--sometimes what I start out thinking I'm going to make turns into something better. In any event, I guess I'd better be a little more diligent at stitching if I want something to show the students.

If you haven't tried working with wool yet, give it a try--it's a lot of fun!

Tuesday, October 5, 2010

A Couple Other Things to Think About

Have you been following the Fall-oween Blog Hop? Sometimes I wonder how I miss these big Blogland events. Why don't you all TELL me about them? Sheesh! Anyway, sometime this past weekend, I stumbled upon the hop--I think I was over visiting Carrie Nelson. If there was a Miss Congeniality award for quilt designers, she'd win hands down! Heck, if there was a Nobel Peace Prize for kindness in quilting, she'd get that too. (AND she's not just another pretty face--she's even TALENTED! Just check out the two pillows she designed for the hop!) Anyway, I finally figured out there was a blog hop going on, so I hopped around and checked it out.

And there went my diet. Sandy Gervais posted an apple dumpling recipe of her sister's in THIS post. Yes, I made it Sunday night. Here's what it looked like when it came out of the oven.


You don't want to see what it looked like ten minutes later. If there is such a thing as apple dumpling-eating locusts, then I'm pretty sure a swarm of them flew through my kitchen.

I also made Gudrun's Creamy Harvest Soup. Quite excellent too, although I decided to add about a cup of shredded cheese--because EVERYTHING tastes better with cheese. (Or chocolate. Fact.)

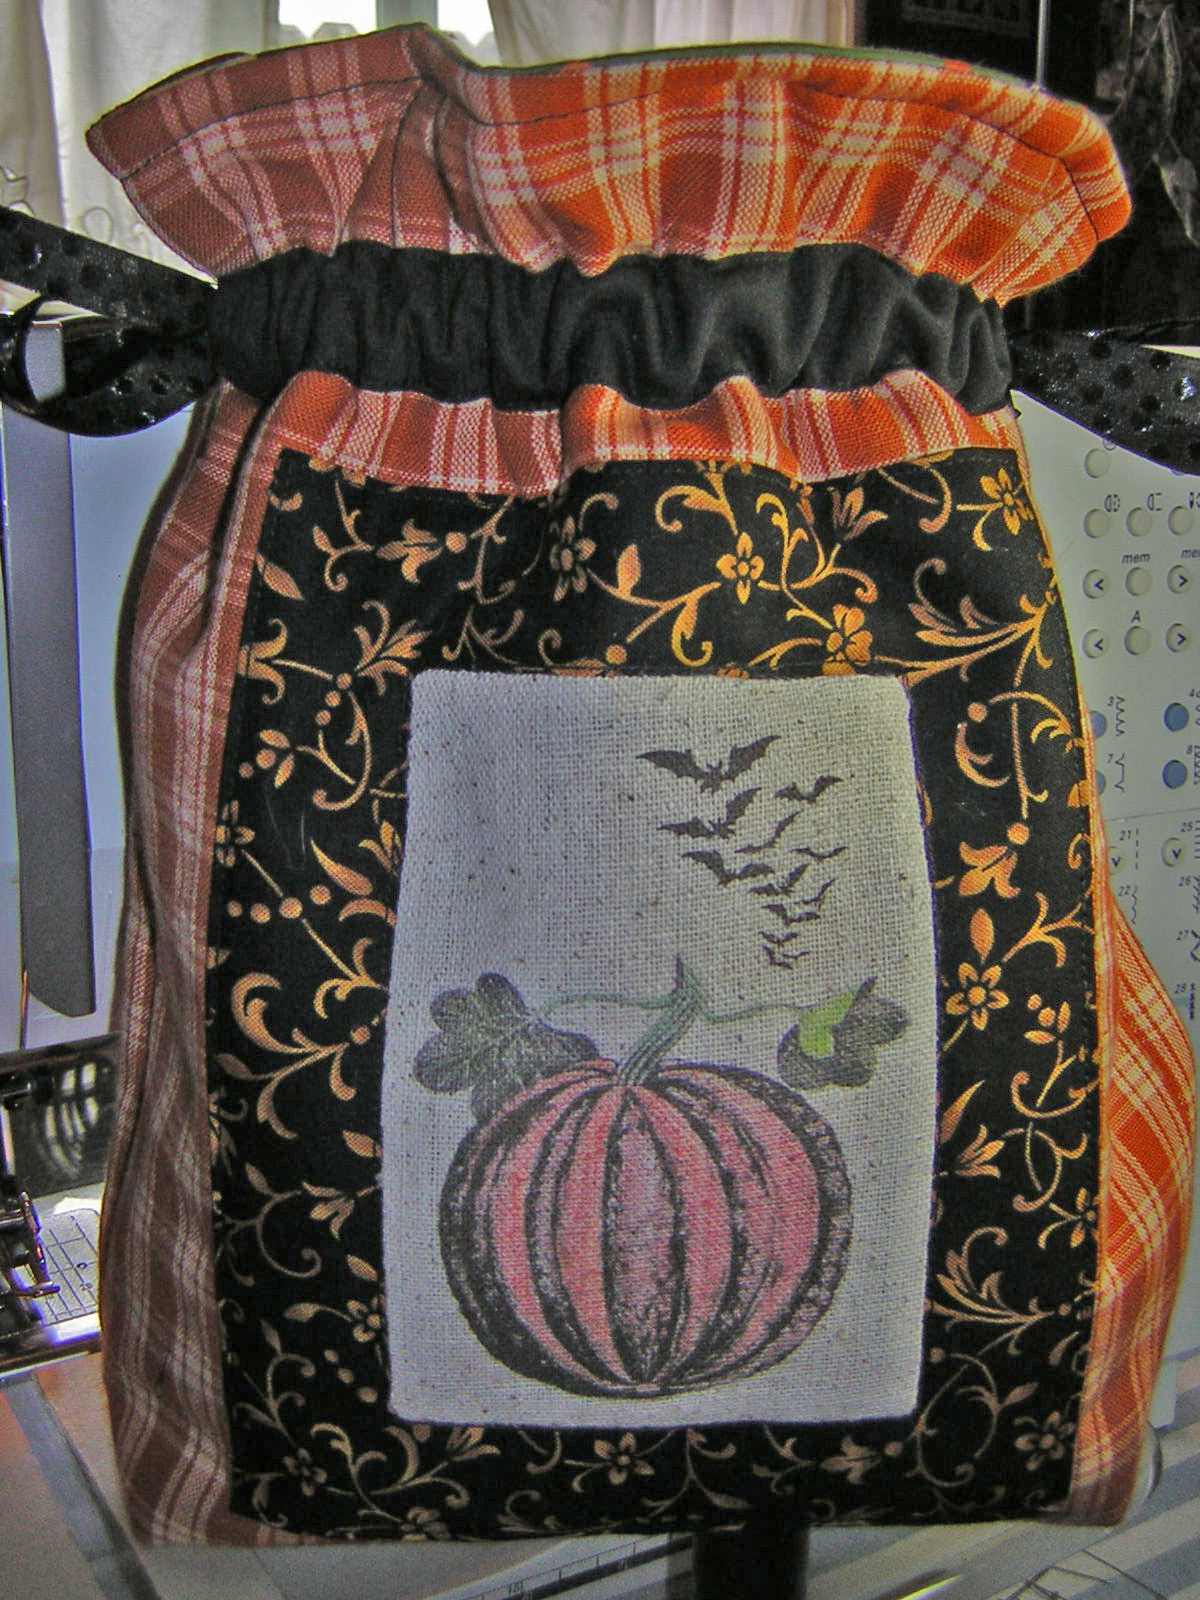
Now, about the Halloween bag tutorial. I wanted to show you a couple other options, but the tutorial was so long, I thought I'd wait and show you today. Here are the bags I made last year for my students in one of my classes:


As you can see it's much the same, but I added a simple embroidered front panel. The difference with this bag is that it doesn't have the corner things at the bottom, so it's not flat on the bottom and doesn't stand up very well.

And here's one I made for a few friends for Christmas. I added a couple wool embellishments to the front of these. These DO have the wider base at the bottom, but I didn't use batting inside, so they don't stand up very well either.


Of course, when they're filled with goodies, they're less "floppy." With these, I also ran the ribbon through both channels and tied it on just one side.

So, if you're inclined to make Halloween or Christmas bags, have fun playing around and adapting the pattern to your own needs. It's pretty versatile. Thanks for stopping by to visit!

Monday, October 4, 2010

A Little Tutorial for You


I'd really LOVE to send all of you a treat bag, but I'm not Santa Claus. Or the Great Pumpkin. Whatever. Sadly, I just can't manage it.

But I thought some of you might be interested in making one for yourself or someone else. Or maybe you'd like to make several. I'll tell you how I made mine so you can make some too.

For the center part, I bought a digital download from Etsy and printed it (four images to a "sheet") onto fabric by ironing a 8-1/2" x 11" piece of freezer paper onto the back of the fabric (kind of a nubby muslin or fine burlappy stuff) and feeding it through my printer. If you want to try this, experiment a little. I ended up with some ink smudges around the edges of my fabric, but I think that's because I used a heavier fabric. You can find instructions online--just do a search for "printing on fabric."

Besides the center graphic (which could be a preprinted piece of fabric instead), here's what you'll need to make the basic bag:

Two pieces of outside fabric cut 10-1/2" x 12-1/2"

Two pieces of inside fabric (lining) cut 10-1/2" x 12-1/2"

Two pieces of batting (regular loft, cotton or cotton/poly) cut 10-1/2" x 12-1/2"

Two pieces of black bias tape cut 10" long (single fold or double fold--doesn't matter; it needs to be wider than the ribbon)

Two pieces of ribbon cut 18" long (or longer)

Here's a photo of what I used:


Make sure whatever you want in the center of the bag is at least 2-1/2" from the bottom edge. Here I was lining up the bottom of the image I sewed into the front of the bag--I'll tell you a little more about that in a second.


Then I positioned the top of the bias tape 1-1/2" from the top edge of the bag.


I then pinned down the bias tape, turning the raw ends under (you can see that in the next photo). And because I was adding the image (with the black background) to the front of the bag, I pinned that in place too, so I could sew it on along the turned under edges. That stitching holds the fabric and batting layers together; if you're making a plain bag, at this point you might want to add some simple quilting to keep the layers together. I also pinned the fabric to the batting at each corner and in the center of the two longer side edges--this keeps the layers from slipping during stitching.


Stitching through these layers works best with a walking foot. You may also need to adjust the foot pressure for the thickness of the fabric, batting, and bias tape.


Sew along each edge of the bias tape, using top and bobbin thread to match the tape. This will form the channel for the ribbon ties. Make sure the bias tape does not extend into the seam allowance.

Also, at this point, sew down the center graphic or add a few "quilting" lines to secure the layers. Next, right sides together and batting side out, stitch together the back and front of the bag along the side seams and bottom. I didn't take photos of this part, because I'm sure you've sewn a million seams!


Next, we'll form the bottom base of the bag. On the batting side of either the front or back, measure and draw squares at both bottom corners--the squares should measure 1-1/2". (I drew these lines before stitching the seams--either way works.)


Cut along the drawn lines of the square.


At the cut-away square, match up the bottom seam with the side seam. The cut away square will form a straight line. (Magic!)


Stitch along the raw edges; repeat on the other corner of the bag.

There! You've finished the outside of the bag. Leave it wrong side out for now and set it aside. Next we'll make the lining.

Place the lining pieces right sides together and sew along the sides and bottom seam, leaving a 3" to 4" opening along one edge of a side seam for turning. As with the outside of the bag, draw 1-1/2" squares at the bottom corners and cut away. Sew the corner seams as you did for the outside of the bag.


Turn the lining right side out and push it down inside the outer bag.


With top edges matched up, wrong side out, right sides together, pin along the edges and sew a 1/4" seam. Turn outside of bag right side out by pulling it through the opening in the side seam lining.


At this point, your bag should look like this:


Finger press the opening in the lining seam and sew closed--on the machine or by hand, whichever you prefer. Tuck the lining down into the outer bag and pin along the upper edge of the bag. Topstitch 1/4" from top to hold layers in place.


Run ribbon through casings (I like to attach a safety pin to one end of the ribbon to help me push it through). Gather and tie on sides. Done!


Now fill it with goodies and mail it to me. Make another for yourself. Enjoy!

Sunday, October 3, 2010

Just a Little Something I Whipped Up . . .

I had a wonderful time with my stitching friends today. Everyone brought some kind of food to contribute and our hostess made a really yummy chicken and rice salad--you can find it HERE--photo and recipe. Heavenly!

The six of us friends started talking about sewing spaces and I mentioned that mine is small, and over the last several weeks, it's become EXTREMELY messy--you know how sometimes spaces become catch-all spots and nothing ever gets put away? That's how mine was feeling. My plan was to do what I could to clean it up this evening.

I came home from our day together and I decided that what I needed most was a little nap; an hour later, though, I woke up refreshed and ready to tackle the job.

It's amazing what a little time spent organizing and cleaning up can do! Somewhere along the way, I came across the "makings" for a small quilt. It occurred to me that if I could finish putting it together, I could put all the leftover pieces away and that would be one less thing cluttering up the room--so that's what I did!


Last spring when I made the picnic quilt, I used some leftover Fig Tree fabric to demonstrate disappearing 9-patch blocks in the class I taught, and that's where these pieces came from. I had everything except the outer borders cut, and the disappearing 9-patch blocks and some of the sashing were already pieced. Easy peasy! Within about two hours (while watching MI-5 on PBS), I had the quilt top finished, and it was a nice break from the cleaning.

Someone--I think it was Cara--mentioned that having participated in the Year of Schnibbles meant having a lot of small quilts made up in case she needed one for a gift, and that's what I think this one will be. I'll need to quilt it, but I think an all-over quilting design would be appropriate and quick for this little quilt. But that will have to wait for another day. I nearly have the Sweat Shop cleaned up, but there's one more project I want to finish and put away before I go back to the other things I've been working on. But that will have to wait for tomorrow because it's my bedtime. Thanks for visiting!

Saturday, October 2, 2010

My Bag is Packed . . .

and I'm ready to go! Well, almost. There are still a couple things to do before I can leave for a day of stitching with my friends.


Like sleep. Yep, it's Friday night, after 1 a.m., and I just emerged from the Sweat Shop to find the house quiet and the fam already in bed.

You may have noticed a distinct lack of quilt content in this blog over the past couple of days, and here's why:


I've been 'sperimenting. I've never printed onto fabric before, and I wanted to give it a try, so I bought a digital download on Etsy and printed it onto fabric. Then I added color with my colored pencils. And stitched it onto other fabric. And stitched THAT onto other fabric. And made a Halloween treat bag.

And tomorrow I'm going to give it to my stitchery hostess. Shhhhh! Don't tell! I think she'll be so busy getting things ready for us that she won't have time to read my blog. And I guess I'll need to make another Halloween treat bag soon for myself, but my next project is to start working on a couple of projects for the wool class I'll be teaching in a couple weeks. In fact, the supplies for that are in the bag--I'll be working on it with my friends tomorrow.

I guess I'd better go get that sleeping thing out of the way so I can go have fun in a little while. Thanks for visiting!

Friday, October 1, 2010

What's Too Early?

Have you started your Christmas shopping yet? Someone in a group of women I was with asked the question the other day and I laughed. Christmas shopping in SEPTEMBER?! Don't be silly! But then a few days ago, I stumbled across something I thought would make the perfect gift for someone, so I bought it. I guess I've started my Christmas shopping.

Have you had your flu shot yet? September seemed a little early for that too, but I got mine today. They offer them at my office each year and this was the scheduled day--about a month earlier than normal. But then one year Hubby and I were on vacation in late September, traveling around Oregon, and I came down with the flu. I was so sick that once my vacation was over, I was STILL off work another week. So I guess September's not too early after all.

Have you decorated your home for Halloween? Or for fall? Well, you KNOW I have. I was looking around the house the other day, admiring the decorations but thinking about the fact that it was somewhere in the 90 to 100 degree range outside with the air conditioning running indoors and I wondered: Did I decorate too early? Well, maybe, but I also know that the weekend I decorated was the only chunk of time I had until sometime well into October. AND it's supposed to cool down by the weekend. So maybe it wasn't too early after all.

As quilters, we HAVE to think ahead. We can't decide to make a Christmas quilt the first weekend in December and hope to USE the quilt the same year. And quilts are one of the best ways I know to decorate for a season or a holiday. So is it too early to work on a Christmas quilt in July? No, probably not. In fact, many of us would finish that quilt top by August and set it aside for quilting the NEXT July--if we even got THAT far. Quilting is a slow process, so it's a good thing most of us are patient.

But sometimes I think we get so caught up in ANTICIPATING the seasons that we don't really enjoy them when they arrive. Besides Christmas, fall is my favorite time of the year, so I have to remind myself to slow down and enjoy it. This year, I've scheduled a week's vacation from work right after Thanksgiving--that's when I'll start to really think about Christmas and begin my decorating and planning. In the meantime, from now until Thanksgiving, other than a couple class projects, I'm just going to enjoy fall and try to NOT think too far ahead. October's here, so that means it's fall in my book. Happy fall!