Thursday, July 12, 2012

Really? Really?!!

Wednesday morning, I awoke at the crack of dawn to the sound of a man yelling in my bedroom window. Boy did that make me mad!

I think you know that my definition of "the crack of dawn" is any time up to around 7 a.m. on a weekday and 8 a.m. on a weekend--maybe even 8:30. This morning, the crack of dawn was at 7 a.m. My alarm goes off at 7:40 a.m.--don't you just HATE missing that last restful hour of sleep? Especially when you've only had five hours of sleep up until that point?

Gosh, I was mad!

You may also wonder why a man was yelling in my bedroom window. I know I was! Fortunately for him, he wasn't AT my window exactly; otherwise, I could have just reached out and slapped him silly. No, he was on my neighbor's upper deck, leaning over the rail, about 30 feet from my open window. I could see him though. I could clearly see him by just opening my eyes, he was that close.

Do you ever wish you'd paid more attention to the bow and arrow lessons in high school P.E.?

I think he must be an actor, judging by the way he was able to project his voice. Deep, loud, and carrying. Oh, and excited too--did I mention excited?

Seriously, how can anyone be excited at 7 a.m.?

Mr. Obnoxious and Self-Absorbed was excited about my neighbors' yard he was looking down at. The beauty of the plants. The size of the fish in the pond. The fresh fruits and vegetables. I guess when he was getting excited and expressing his admiration, the neighbors were still in the house somewhere because their voices were muffled. And yes, they are dedicated gardeners over there. I'm certain I've told you about them before--how they work in their yard all weekend long with their radio turned up, blasting out hits of the 60s, 70s, 80s, and 90s, from around 9 or 10 a.m. until late in the afternoon. But at least they don't start at the crack of dawn--I'm thankful for that small mercy.

Sometimes I just truly hate people. I know--hate's not a good thing. But anyone who messes with my sleep is seriously asking for hate. Or challenging me to get some quality bow and arrow practice in. (Although now that I think about it, I'm pretty sure I could make something happen with a large slingshot and one of my cats. I'll have to give that idea a little more thought.)

I know I said I'd show you how I applique "valleys" tonight, but I needed to rant instead. I'll try to post about applique before I leave for the retreat tomorrow or when I get home again. In the meantime, just remember: If you're ever up at the crack of dawn, don't even THINK about coming near my windows, okay?

How accurate do you think potato guns are at 30 feet?

Wednesday, July 11, 2012

Get the Point?

As with most things in life, getting pretty good points in applique is a matter of practice. The basic technique involves turning and tucking and trying not to fray the fabric while you're doing it.

And sometimes, the easiest way to do it is to not make a point at all! Quite often a curve will serve just as well as a point, depending on the design and the reason for the point. Much of the time, I'll look at a design and think about whether the points can be rounded off; if they can, usually I'll do it that way. But sometimes--as with stars--the design probably wouldn't look quite as well with curves.

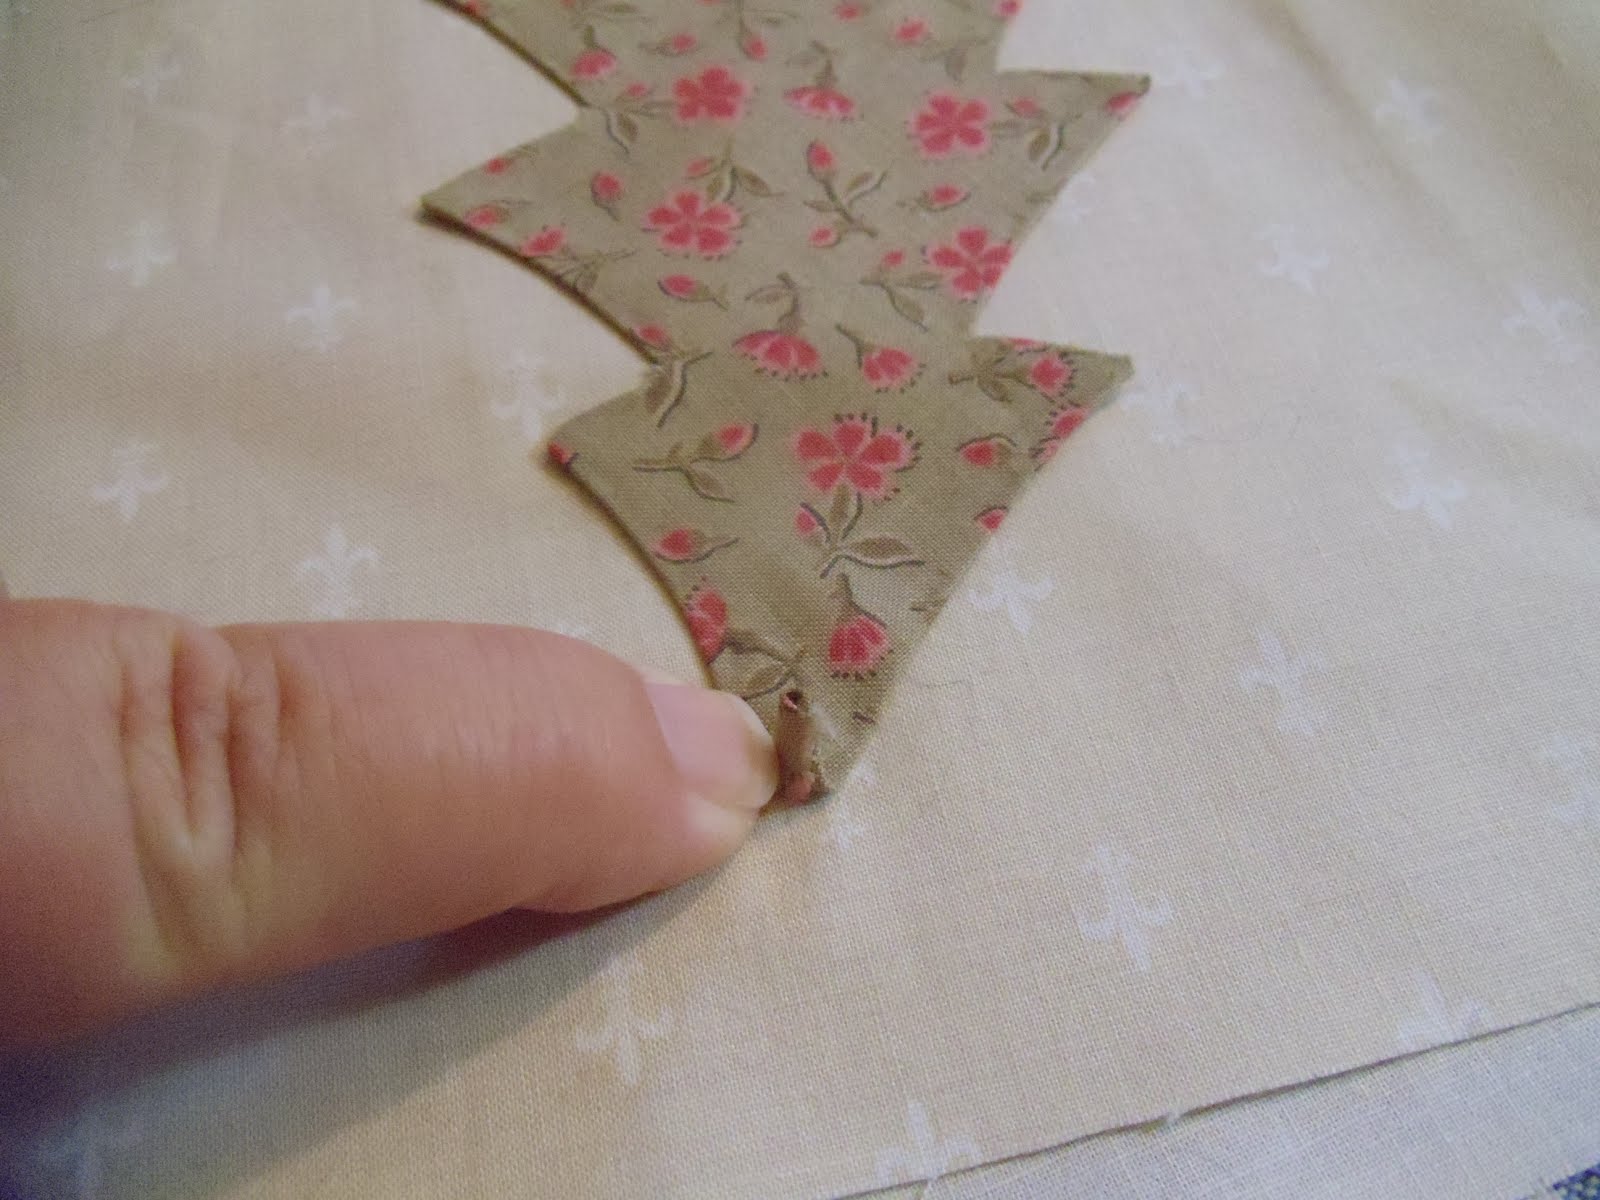
In the first photo, I've lifted up the point to show you that I've ironed the fabric to one side and then the other to form a point. That is done during the preparation of the applique piece, and I don't glue the tip down, because I know I have to do a little manipulation with it.


In the next photo, where I'm not lifting up the tip, you can see there's a bit of overlap of fabrics from the back, and one side is sticking out a little from underneath the point.


I stitch along the straight edge until I get closer to the point and then I trim off the fabric flap that's sticking out. I'm careful not to cut too close to the tip and to leave myself at least a few threads of fabric that can be turned under and stitched. Also, I've found if I trim the little flap too soon--before I get to the tip--sometimes the fabric at the cut will fray a bit just from handling it and I won't have a good folded edge to stitch through.


There's no photo that actually shows this part, but I gently push the cut edge of the fabric under the tip with my needle--it will make the tip a bit bulky but at least the point will look like a point. This is where the practice comes in--don't expect it to be perfect the first few times. Or EVER for that matter--as long as I've been doing this, my points aren't perfect, but I think they're good enough.


There are various glues and gadgets appliquers have come up with to help with points and valleys. Take a few classes and try out different techniques and tools--you might find something works really well for you. I find that the more "stuff" I try to use, the more likely I am to turn the applique piece into a frayed mess, so I keep it simple, but that's not to suggest one of the techniques won't work well for you.

Now that I made it over the tip, it looks like I'll be heading to the valleys next. I'll show you what I do there tomorrow night.

Tuesday, July 10, 2012

Some Applique Lessons

I thought since my time is a little limited this week, I'd post some hand applique "lessons" for those of you who have had questions. Tonight I'll just show you the basic stitch I use--where to place the needle and how long the stitches are. In the next couple evenings, I'll show you how I make my points and how I treat the "valleys."

I told you awhile ago about the methods I use to prepare the applique pieces and glue them into place. These "lessons" will pick up where I left off.

First, you should select a thread color that blends as well as possible with the color of the fabric you're appliqueing--not the background. I like to use cotton threads, just as I use for piecing and quilting. Some appliquers prefer silk thread. I DO like silk, but I don't have a very good color selection. I also find the thread slips out of the eye of the needle, although silk is fine enough that you should be able to knot the thread onto the needle and still pull the needle through the fabric without noticing the knot. Experiment and see what you like best.

I've also known appliquers to stitch in the oddest directions! I'm right handed and I prefer to stitch from right to left, but you may find you prefer something different. I think it was Robert Callaham who stitches with his needle pointed toward himself. You will need to be able to see the needle and your stitches, but go with whatever is comfortable to you, as long as it works well.

Cut your applique thread about 18" long and knot one end. Use a fairly fine, sharp needle--again, try out a few sizes and find something you like. I find that some of the needles that are recommended for applique have a tendency to bend, but you may love them--again, experiment. You'll probably note in my photos that the needle I'm using is bent a bit.

The first stitch should be somewhere on a fairly straight edge of the applique piece. Come up from underneath and just catch a thread or two of the edge of the applique piece. Bring the thread straight back down, just outside the edge of the applique fabric, through the background fabric, angling the needle just a bit underneath the applique piece. (This is what I'm doing in the photo below. I've turned the edge up for the photo, but I see it looks like I'm going further under the applique piece than I truly am.)


Bring the needle back up again about 1/8" of an inch further along, catching just a thread or two of the applique piece. (You can either bring the needle down and then back up again in two separate steps, or you can just rock the needle back up and through the fabric as shown here.)


Continue on in this manner until you come around to where you started. Knot off the thread on the back of the fabric, and snip the excess thread, leaving just a short tail.


Here's the back of the teacup I was appliqueing--you can see the stitches. They are just slightly offset from being in a straight line because I've brought the needle up through the background and applique fabric and gone back down just outside the applique fabric.

Don't pull your stitches so tight that the fabric puckers, but DO pull them tight enough so the applique thread "melts" into the applique fabric. One way to do this is to take three or four stitches and then pull firmly on the thread to make sure there isn't any slack in the stitches.

Tomorrow I'll show you how I do my "points."

Monday, July 9, 2012

No, As a Matter of Fact, I'm NOT Tired of Applique Yet

I had to stop and ask myself the question the other day: "Are you tired of applique yet?" After all, I'm half way into the Year of Applique, and while I've done a bit of piecing here and there, my main focus has been applique. And based on the number of applique block of the month projects I'm currently working on and signed up to start, this may well turn into the DECADE of Applique.

Really, if you've never tried any type of hand applique, I encourage you to try it--especially if you like other hand crafts like hand quilting, hand embroidery, knitting, etc. Applique is just one of those types of projects that can be relaxing and--maybe best of all--doesn't require a lot of "stuff" (although, yes, the method I use DOES use a number of notions and gadgets--but they aren't really necessary).

Later this week, I'll be leaving for a retreat with Verna Mosquera of The Vintage Spool--the retreat is on Friday, Saturday, and Sunday. The pattern for the retreat is her new Secret Garden block of the month:


While Secret Garden is a beautiful quilt, and I'd really like to make it someday, I'm not feeling it right now. We (Gran and I) actually signed up for the retreat before we saw the pattern. I've decided I'd like to work on her Abundance pattern instead. Although I have a lot of Halloween and fall quilts, I don't have any quilts with TURKEYS on them, and I think this would be an excellent quilt to display after I've taken down my Halloween quilts. Here's what that pattern looks like:


I will probably make mine in darker shades--more along the lines of 1800s or Thimbleberries fabrics, I suspect.

I will probably have to work a little overtime this week and I'll also need to get things ready for the retreat. I'm telling you this in case my blog posting is a little spotty this week--you'll know I'm just busy. Also, I won't have a computer with me when I'm at the retreat, so no blog posting then either. But I hope I'll have lots of stuff to tell you about when I get back.

Obviously, when I asked myself if I was tired of applique yet, the answer was a resounding NO! Thank goodness, right? I'd be in trouble if I was! Will any of you be at Verna's retreat? I'd love to see you there.

Sunday, July 8, 2012

Yes, It's Done Now!

Block 7 of the Country Cottages block of the month is finished--yay!


I really love these designs and can hardly wait for Shabby Fabric's Sweetheart Houses block of the month to begin--the first month's kit should arrive a little later this month, probably around my birthday which is on the 23rd. Sweetheart Houses looks much like Country Cottages but better. If you haven't seen it, click HERE.

Here's a look at my first seven blocks--please ignore the quilt-in-progress on the design wall under the blocks--


I'm starting to think about how I might want to set these blocks--I'm not sure how I'm going to be able to be patient until December when we get the last block design! I wonder what August's block will look like? I kind of think I'd like to make my house blue but maybe not; I'll have to wait and see the rest of the design. I'm not good at waiting.

Saturday, July 7, 2012

Football Hero

Has this week seemed weird to you, with the holiday in the middle of the week? Normally we put our garbage cans out for pick up on Monday night; Thursday night Hubby went outside and was wondering why no one had put their garbage out!

If you read my blog regularly, you know Soccer Son is crazy about soccer. He plays soccer, he coaches soccer, he puts on soccer camps for kids, he hires himself out for private training sessions, and every now and then--as many soccer players do--he kicks a football.

This year he's been the kicker--when he isn't tied up with a previous soccer commitment--for the Roseville Bears, one of the teams in the Pacific Coast Football League. A couple of weeks ago, the Bears made it into their league's championship game, and Soccer Son was available to play. Unfortunately, Hubby and I weren't present, but we've been told the Bears were ahead much of the game, then the other team came back and scored two touchdowns, and that put them a point ahead of the Bears. As the end of the game neared, the Bears got the ball, and with something like three seconds left on the clock, Soccer Son kicked the winning field goal.

Pandemonium ensued, grown men cried, and Soccer Son was carried off the field a hero.


Soccer Son, however, is much more humble. As he has told anyone who would listen, all he did was make a reasonably easy field goal; it was the other players who got them into position to do it, and that took a lot more skill, determination, and drive. But you know how it is--the guys that make the scores are the guys that get much of the glory.

This past Tuesday night, the night before the holiday, Soccer Son called to say the team was in the 4th of July parade. As much as I'd have liked to sleep in late on the 4th, Hubby and I decided we should go see the parade--which we did, along with Soccer Son's Lovely Wife to be (in September). Here's a photo I took of Soccer Son carrying the team's trophy, which is nearly as tall as he is!


I have to share with you, though, my favorite photo from the parade:


Isn't he a cutie? His mom and dad had red, white, and blue hair--the entire family was caught up in the excitement of the holiday.

Tomorrow Soccer Son's football team plays again--this time they play the champions of another league, the West Coast Football Association. Soccer Son has other commitments, though, and will have to miss the game. If they win, they'll move on to the next play off game; if they don't, the season will be over as will Soccer Son's kicking career. He feels he's stretched himself too thin this year. He didn't think it was fair to the team when he had to miss games, so he'll have to give up something--and it's never going to be soccer if he has any say in it!

Friday, July 6, 2012

Did You See?

Shabby Fabric's block 7 of their free Country Cottages design is posted and available.


I've been working on getting my pieces prepped for applique tonight. I used some wool for the stars and rick rack for the stem and trim on the flower pot.

I put the first six blocks up on the design wall again--this is really going to be a fun quilt when it's done! I'll show you the block when I've finished, probably this weekend. I bet the added embroidery will really make it come alive.

Thursday, July 5, 2012

Scraps

Did you have a happy 4th of July? We did! In the morning we attended a parade and then we went out to lunch with Soccer Son and His Lovely Wife to be (in September). The afternoon brought naps followed by a relaxing evening playing in the Sweat Shop.

One of the things I played around with this evening was making pincushions from a couple of vintage Jello molds given to all of my stitchery group by our friend Sandy (along with the crushed walnuts shells and fabric needed to make the pincushions). The way I made mine was to cut circles from the muslin lining fabric Sandy gave us, and then to sew a basting stitch along the outside edge of the circles. I next gathered the circles closed once they were filled with the crushed walnuts. I used the same method for the outside layer of fabric. I decided to use some red fabric scraps from my stash to make mine look like cherries, and then I added felted wool "leaves" that I attached to wired floral stems.


Before I added the stems and leaves, though, I glued the "cherries" into the bases. I also poked holes through the fabric to glue the stems into the cherries. I'm pleased with the results and grateful to my friend Sandy for gifting me with the materials I needed to make these.

Now, I said I'd announce the winner of the Halloween scraps tonight, and that person is Homegirl Marlene who said: "I would love Halloween Scraps!!! I am in the US, too!!! What a great idea."

Marlene, please email me your mailing address and I'll get these into the mail in the next few days. Thanks to everyone who left comments--I wish everyone could win, but maybe you'll be the lucky one next time!

Wednesday, July 4, 2012

Worth Saying Two or Three Times

I've warned you before on the 4th of July, a couple times, but sometimes good advice is just worth repeating:


No matter how patriotic you're feeling or how much you've had to drink at the 4th of July barbecue today, DON'T stick glow in the dark adhesive stars on your nipples. Taking them off hurts a lot.

Have a safe and sane--or safe insane?--holiday!

This has been a public service announcement. You'll thank me for it tomorrow.

Tuesday, July 3, 2012

Only 120 Days Until Halloween!

Over the weekend, when I was looking through my scrap bin for fabrics for the Leap Year quilt, I realized that I had quite a LOT of Halloween/fall scraps. I then looked over at my Halloween/fall fabric shelf and realized it was pretty well packed too. This is just half of my scraps--


Do you need some Halloween/fall scraps? Do you have a US mailing address? If you can answer "yes" to both of these questions, leave me a comment letting me know you'd like your name added to the Halloween scrap drawing. Oddly enough, I'll draw a winner on the 4th of July (one good holiday deserves another!) and announce the winner on Thursday's blog post. Good luck!